Thanks for more than two lakh views. All about openCV, Image Processing converging towards Biometric face recognition. Use the Easy Navigation button on the top bar to view all the posts at a glance related to openCV. I kept this blog small so that anyone can complete going through all posts and acquaint himself with openCV.
Guess, you people have unzipped the CSU face evaluation system, about which I explained in the previous post. After unzipping, consider the folder in which we unzipped is called Main folder.
Inside the Main folder, there will be a README file, that instructs how to install the CSU face evaluation system. Do it, and make sure it happens with out any errors. If there is an error, it is related to some package absense. Look through the error carefully and install the missing packages.
After installing, with in that README file, there are some tests related to scraps data which is present in the Mainfolder/data/csuScrapShots/source/pgm folder. These are the images from the year book of 1925 of CSU. So we can perform initial tests of PCA, LDA, Bayesian and EBGM approaches using the commands listed in the README.
Also, with in that README file, if you have FERET database, there are tests related to grey FERET database. If you don't have a FERET database, you can try to get it online searching in google. I would have given you, but it's redistribution is prohibited.
After running the tests on either of them or any one of them, you can view the results in Mainfolder/results folder.
The UsersGuide pdf document, that is present in the main folder, explains you everything you need to know, to get started using that system. It is like a bible for CSU face evaluation system.
In the main folder, the src folder contains C-programmes related to various executables that we use while we are running tests related to biometric face recognition.
The data folder is the epi centre of all the data that we use in running the tests. The normalised images are also stored here.
The distances folder contains the distance metrics related to PCA, LDA and other approaches. Carefully observe these distance files, relating it to the data. It is because, if you build a face recognition system, you have to make the distance files similar to the ones present here and keep them in a folder just like PCA, LDA and all and trigger the comparison scripts.
The final results are stored in results folder. The training data, which is created when we are doing PCA, LDA or Bayesian training is stored in train folder.
This is it guys, I have shown you a way into biometric face recognition. Now it's up to you to figure out. If you need any help, leave the comments, I am always ready to help. If I think there is a need for extra post, I will definitely do it.
But I don't want you to stick to my blog for your entire career. That is the reason I kept a time frame.
Life has to go on. Hit the "+1" on right side bar and say good bye.
We talked about haar training in the previous post. Let's see how far we have come till date
1. Installed opencv
2. Did some good exercises related to openCV intro programming
3. Created eye and face detectors using haar cascade classifiers
4. Learnt how to create an xml file with haar training that can be used to create an object detector
Now let's divulge into our main topic of biometric face recognition. In one of my previous posts, I told you about Biometric face recognition, it's significance and the contests related to it.
The reason I made you learn the creating of face detector due to the fact that the first step in face recognition is detecting the face in a back ground, like the one shown below
Detecting face is just the beginning. The next step is to normalise the face, so that only the face part is cut. Then we will apply histogram equilisation to make the face invariant to brightness and contrast. Finally, we rotate the face, so that the eye coordinates remain on same height. This is needed, since we will be comparing photos for face recognition and if the guy tilts the head, his nose may be taken as one of the eyes, by mistake by the recognition system. In the end, the piece that we actually need looks like this
The face recognition system compares this face, with the faces like this to recognise people. Incidentally, there is a savior for us. It's the CSU face evaluation system. Just google for the name and download the zipped file. The beauty of CSU face evaluation system is that, you supply the image containing face, along with any back ground, with the eye center coordinates, and it returns you the face which is detected, normalised, equalised and rotated.
The only thing, that we need to supply it, is the eye center coordinates of the image i.e., the x and y coordinates of left eye center (eye ball center) and the same of the right eye. To get these coordinates, I used the eye detector, which I made you learn in the previous posts. Since, it draws a square around the eye, finding the center of that square is no big task. Will explain it to you in future posts, and the next post will be on sunday ( 28/08/11). For now, just download the CSU face evaluation system and try to decipher and also carefully go through it's documentation.
In the previous posts, I used haar cascade xml files for the detection of face, eyes etc.., In this post, I am going to show you, how to create your own haar cascade classifier xml files. It took me a total of 16 hours to do it. Hope you can do it even sooner, following this post
Note : The below is only for linux opencv users. If you are a windows user, use this link
For most of the dough, that is going to come, you will need these executable linux files. Here's the link for it.
Before I start, remember two important definetions
Positive images : These images contain the object to be detected
Negative images : Absolutely except that image, anything can be present
It's better to explain, with an example. So I will tell you, a step by step procedure, to make a classifier that detects a pen. You can use the same for any object, you are going to experiment.
First of all, I took the photographs of three of my pens, along with some background, the pics looked like the one below
I took a total of 7 photographs (I didn't care to count, for which pen, I took more photographs, out of three) with my 2MP camera phone and loaded them into my computer. Now I cropped, each one of them using Image Clipper excluding the background and storing only the pen's image. Image clipper can be downloaded from the link below
The one thing that I hated about this imageclipper is that even though it made me work fast, it requires me to install a lot of other libraries. It would have been much simpler, if I just used GIMP, to crop, since there were only 7 images and cropping would have been easier. It is upto you, to follow the way you find easier.The cropped image looks like the one below
From here on the procedure is simple. As I told you at the starting of post, after downloading the necessary linux executables, keep them in a seperate folder named "Haar_Training", where you need to carry on your experimentations. Now inside that folder, create three folders and fill them with the necessary data, as explained below
1. Positive_Images : In this folder, I kept all my seven cropped images
2. Negative_Images : In this folder, I kept some other images (99 in total), which can be any image that you have, except, they should be of like genre and should not contain any where the cropped part i.e., pen
3. Samples : Keep it empty
Now, your Haar_Training folder looks like this
Now, navigate into that Haar_training folder through terminal. In the folder named "Positive_Images", the images are in png format and in "Negative_Images", they are in ppm format. So accordingly, I collected the information about those files in two text files named postives.dat and negatives.dat repectively using the below two commands
In the next step, I used the samples folder, to store the training samples, by issuing it as arguement, along with positives.dat and negatives.dat using the below command
The important arguements in the above command, to be discussed are
positives.dat - Contains the list of positive image paths
negatives.dat - Contains the list of negative image paths
samples - The folder that is used to store the data of training samples
250 - No. of training samples
-w 160 -h 20 - These two signify the width and height ratio of the pen. Originally it's -w 20 -h 20 for face. But, since I am using a pen here which is long and thin unlike face I made it 160 and 20
The next two commands use the data in samples folder to create a unified training data, that is used for haar training
This creates the haarcascade xml file desired by us in the same Haar_training folder, keeping all the meta data, that is forms in the meanwhile in the haarcascade folder, which is created automatically. The arguements to be noted in the above command are
haarcascade : The folder in which meta data can be kept
samples.vec : The unified training data, that we created just a while ago, before this command
negatives.dat : The list of negative image paths
20 - Stages, the more, the better, but great time consumer
99 - No. of negative images
2048 - The RAM memory that can be used
It took me five hours for this process to complete and generate my final pen detector. If you are a bit skeptic about the final outcome, instead of waiting for five hours, at any time, when the above command is running, you can issue the below command, to generate a intermediate haar cascade xml file, from the data available.
Now finally after five hours, I got the haar cascade xml file. As I have shown you, in the previous posts, the way to use haar cascade xml files. I experimented on some pens of my own. Below is the youtube video for it.
Update (16 March, 2012): On the request of people I am sharing the haar classifier file for Pen detection. Below it the link for it.
Please note that I used very less sample images, less than a 100 to create it, while in reality we use at-least 5000-10000 images to create a robust classifier. So, it may give false positives in some cases
Update (25 March,2012): The link to the executable Linux files that I gave earlier is slowly loading or sometimes not working at all. So here's the new link for it
In my previous post, I showed you how to use your webcam to do face detection.In this post, I will explain you of how to use your webcam for eye and face detection.
Before we start, for those of you who couldn't use your webcam for face detection, I have ripped the code from previous post to make a code that takes an image as input and returns the same image with a rectangle drawn over the face as output.Here's the link for it
Let's go straight into our eye +face detector.Before you go inside the code, first check the face detector , because most of the code here is hacked from it.Check it out here
Here's the code for eye+face detector using your inbuilt webcam.Also note that, there is no robust eye detector related cascase file (XML file) till date.I have tested and included the most powerful one.But neverthless, if you have spectacles, remove them during testing.
//Programme to detect faces through the webcam using the haar cascade
//Links Used:http://www.opencvuser.co.cc/2011/06/face-detector.html

#include
#include
#include

CvHaarClassifierCascade *cascadeface,*cascadeeyes,*cascadenose,*cascademouth;
CvMemStorage *Membuffer;

void detectfaces(IplImage *frame)
{
int i;
CvSeq *faces=cvHaarDetectObjects(frame,cascadeface,Membuffer,1.1,3,0,cvSize(30,30));//Maximum 3 neighbourhood images and the last cvsize gives minimum size of face
for(i=0;i<(faces?faces->total:0);i++)
{CvRect *r=(CvRect *)cvGetSeqElem(faces,i);
cvRectangle(frame,cvPoint(r->x,r->y),cvPoint(r->x+r->width,r->y+r->height),CV_RGB(255,0,0),1,8,0);
//cvSetImageROI(frame,*r);
//Draws a rectangle with two points given with color of red and thickness as 8 and line type - 1
}

}

void detecteyes(IplImage *frame)
{
int i;
CvSeq *eyes=cvHaarDetectObjects(frame,cascadeeyes,Membuffer,1.1,3,0,cvSize(10,10));//Maximum 3 neighbourhood images and the last cvsize gives minimum size of eyes
for(i=0;i<(eyes?eyes->total:0);i++)
{CvRect *r=(CvRect *)cvGetSeqElem(eyes,i);
cvRectangle(frame,cvPoint(r->x,r->y),cvPoint(r->x+r->width,r->y+r->height),CV_RGB(0,255,0),1,8,0);

//Draws a rectangle with two points given with color of red and thickness as 8 and line type - 1
}


}


int main(int argc,char *argv[])

{IplImage *frame;
CvCapture *capture;
int key,i;
cascadeface=(CvHaarClassifierCascade *)cvLoad("haarcascade_frontalface_alt.xml",0,0,0);
cascadeeyes=(CvHaarClassifierCascade *)cvLoad("haarcascade_eye_tree_eyeglasses.xml",0,0,0);


//Loading the haar... file

Membuffer=cvCreateMemStorage(0);//Allocating the default memory for image (64K at Present)

capture=cvCaptureFromCAM(0);//Capture the image from cam with index 0

assert(cascadeface && cascadeeyes && Membuffer && capture);
cvNamedWindow("Video",1);

while(key!='q')

{frame=cvQueryFrame(capture);
if(!frame)
break;

//cvFlip(frame,frame,-1);//Uncomment this if you are getting inverted video
frame->origin=0;


detectfaces(frame);
detecteyes(frame);

cvShowImage("Video",frame);//For showing the video
key=cvWaitKey(10);
}
cvReleaseCapture(&capture);
cvDestroyWindow("Video");
//cvReleaseHaarClassifierCascade(&cascade);
cvReleaseMemStorage(&Membuffer);
}
The downloadable Linux executable and the two XML files I used, along with the original program are in the below link
Today, let's take an important step towards face recognition - face detection
First, let me tell you the difference between both.Face detection is just telling whether there is a face or not in the given image, on the other hand, face recognition is telling to which person that face belongs.
This is the code for face detection using your webcam.Actually, this is not exclusively my code, I hacked it from the code given by Nashruddin which inturn was hacked from the openCV samples.Any way, that's what makes the open source software better and better forever :)
Here's the code snippet
//Programme to detect faces through the webcam using the haar cascade
//Links Used:http://nashruddin.com/OpenCV_Face_Detection

#include<stdio.h>
#include<cv.h>
#include<highgui.h>

CvHaarClassifierCascade *cascade;
CvMemStorage *Membuffer;

void detectfaces(IplImage *frame)
{
int i;
CvSeq *faces=cvHaarDetectObjects(frame,cascade,Membuffer,1.1,3,0,cvSize(30,30));//Maximum 3 neighbourhood images and the last cvsize gives minimum size of face
for(i=0;i<(faces?faces->total:0);i++)
{CvRect *r=(CvRect *)cvGetSeqElem(faces,i);
cvRectangle(frame,cvPoint(r->x,r->y),cvPoint(r->x+r->width,r->y+r->height),CV_RGB(255,0,0),1,8,0);

//Draws a rectangle with two points given with color of red and thickness as 8 and line type - 1
}

cvShowImage("Video",frame);


}


int main(int argc,char *argv[])

{IplImage *frame;
CvCapture *capture;
int key;
char filename[]="haarcascade_frontalface_alt.xml";//This is the cascading file that is needed for face detector it is generally present in if openCV is your installation folder, it is present in openCV/data/haarcascades folder, don't forget to paste the haarcascade file in the same folder as your program before compiling


cascade=(CvHaarClassifierCascade *)cvLoad(filename,0,0,0);

//Loading the haar... file

Membuffer=cvCreateMemStorage(0);//Allocating the default memory for image (64K at Present)

capture=cvCaptureFromCAM(0);//Capture the image from cam with index 0
//Note that if you are using a Laptop with an external webcam it has an index 1 since the Lappie cam's index is 0

assert(cascade && Membuffer && capture);//To make sure that everything needed is always available
cvNamedWindow("Video",1);

while(key!='q')

{frame=cvQueryFrame(capture);
if(!frame)
break;

//cvFlip(frame,frame,-1);//If you are using openCV on windows, uncomment this line
frame->origin=0;


detectfaces(frame);
key=cvWaitKey(10);//Wait for 10 milli seconds, the user may press 'q'
}
cvReleaseCapture(&capture);
cvDestroyWindow("Video");
cvReleaseHaarClassifierCascade(&cascade);
cvReleaseMemStorage(&Membuffer);
}
For your convenience, I have added the comments in the code above.Don't bother if you feel lazy to copy the content.I kept the above program and the haar cascade xml file that you need to use in the link below.
I know, some of you are even lazy to, compile the code, so I have included a Linux executable in the above download link.
And this is a bonus, a youtube video of me with my face detector.I shot the video with poor lighting conditions and a VGA cam, that's why not a good one (I look 10 times more handsome), but serves the purpose
All the code in the snippets will be similar to that of hello world program as shown below
//Program to create the negative of a given image

//Links used:http://www.cs.iit.edu/~agam/cs512/lect-notes/opencv-intro/


#include<stdio.h>
#include<cv.h>
#include<highgui.h>
int main(int argc,char *argv[])
{int i,j,k;
IplImage *img=0;
int height,width,step,components;
uchar *data;
if(argc==0)
{printf("Could not load image");
return 0;
}
//Loading image
img=cvLoadImage(argv[1]);
if(img==0)
{printf("Image loading error");
return 0;
}
//Assigning data
height=img->height;
width=img->width;
step=img->widthStep;
components=img->nChannels;
data=(uchar *)(img->imageData);
printf("The picture's size is %d X %dnThe image has %d componentsnEach step length is %dn",height,width,components,step);
//To get the negative of image
for(i=0;i<height;i++)
for(j=0;j<width;j++)
for(k=0;k<components;k++)
data[i*step+j*components+k]=255-data[i*step+j*components+k];
cvNamedWindow("Lena",CV_WINDOW_AUTOSIZE);
cvMoveWindow("Lena",50,50);
//Showing the image
cvShowImage("Lena",img);
cvSaveImage("Lenanegative.jpg",img);
//Waiting for a key press
cvWaitKey(0);
//Releasing the image
cvReleaseImage(&img);
return 0;
}
The code snippets contain three additional problems and their folder names are as follows :
MnMdVr - This folder contains the finding of mean, median and standard deviation of image, using openCV inbuilt functions and some hacking of the helloworld.cpp code, which you wrote previously
Block-Processing - This is same as above, except, the finding of mean, median and variance are found block wise, like for every 20x20 pixels or so
Sobel - This one contains the famous sobel edge detection technique, very simple one
If the link goes down, tell me in the comments section, I will correct it.Also if you have any doubts understanding the code snippets, do comment them.
So keep trying to understand the code.If you already did the home work yourself, then very good.
If you have come this far, it is just a few steps away.On thursday, we will discuss about face detection and then saturday and sunday, we will drill down the most important topic -- "Haar Training"
And one more thing, from next post on, I will be personally posting and analyze the code snippets for you, step by step.
Today, let me tell you about the importance of face recognition and why is it the most sought out research in the present decade.You may have already been using the "iphoto" from Apple, which lets you name people once and then it automatically searches through your entire photo library and names them.That's face recognition.Let me tell you something more.What if it names wrong ?
Credit: Simson Garfinkel and Beth Rosenberg
Here's the greatness of Apple, it updates it mathematical model and becomes more robust.Some times it may ask you doubts also, like a small child learning to crawl :)
Google's picasa also offers, I hadn't tested it, but reviews say it is in no way the nearest competitor to Apple.You may have already heard of facebook auto tagging feature, which is a very great idea, but facebook should not have automatically enabled that feature in all accounts.And the latest news is that Google's trying to take advantage of it.It's former CEO Eric Schmidt appealed to the US government that it's a threat to national security.You may have already heard of facebook hiring a private agency to launch "article" attack on google.That's a wholly different story let's come back to our topic.
Apart from fun, actually the main reason why face recognition had to be invented and to be moved forward like a crusade is the security threats.Reports say that after the 9/11 attacks, the US government has been heavily investing on this, so that the technology can be applied in airports, railway stations and other public places to detect terrorists.But whenever the terrorist grows some beard or changes hair style or face color, it fails.Although recently more scientists claim that they have discovered the best technologies, there is no clear winner in this arena, due to the diversity in the testing procedures.Some facial recognition technologies use one image per person, while others need more than four images per person, and some need facial landmark locations accurately.In order to over come this a common facial recognition test need to be conducted using the same data for all.
This need is discovered by the Us Government early on and they have carried out these tests for every four years or so.They started the tests in 1993 and successively conducted on 1993, 1994, 1996, 2000.Recently they started a new format for testing called "Face Recognition Grand Challenge" (FRGC).The most recent one is the FRVT 2006.They may conduct another one in 2012
If your college or university wants to participate in that evaluation, you can visit their home page.Below is the link for it
I hope you are doing well with the assignments, tommorrow I will post all the code snippets for the assignments I gave you.By the end of this month you will be pursuing the research on face recognition I assure you.If you are a first timer, visiting this blog, you can view the archives in the right hand side.
I expect every one of you is going forward with the assignments.There are some more confusing terms you will encounter while doing the assignments, let me give some details
Step - A step is the number of column pixels present in an image.So for every step, the height of the image increases by one step
Components - They are equivalent to channels, so for an RGB image, there are 3 components (Red, Green, Blue) and for a grey scaled image, there is 1 component (White)
Resolution - This is the dimension of the image, in simple terms it is number of row pixels / number of column pixels
Also this is one of the links that I forgot to give, it gives the best possible documentation for openCV
Keep going forward with enthusiasm and curiosity, I have a time frame for this blog to complete the tutorial in the next 25 posts, but I may take a leave in the middle after the 30th of this month for 20 days, will try to complete it before that.I want to take you people till face recognition and leave you there for furthur research
I hope you already did the Hello World programme mentioned in the previous to previous post.For today, I will give you some assignments, try to do them.Take help of openCV documentation and the Hello World programme you had already written.Try to use the already available functions in openCV library as much as you can
Orginal Color Image
1.Make a color image into a grey scale image
Grey scale Image
2.Produce a negative of an image (Already over - helloworld)
Negative Image
3.Make a grey scale image, pure black and white (You can use the hint I mentioned in the previous post)
4.Apply patches of 4 different colors to an images
Patched Image
5.Calculate the mean, variance and standard deviation of the image
6.Create the histogram of an image, it should be printed as a seperate image
Blue Pane
Green Pane
Red Pane
Histogram is a graph, which plots the intensity of a color versus all the pixels in the image.It shows the intensity of that color at every pixel value of the image.So for an RGB image there will be three different histograms each corresponding to a different color and for grey scale only one.
If you have any doubts post them in the comments section and I am giving you three days of time to accomplish these tasks, meet you again on Tuesday
Most of you may have worked with Adobe Photoshop or Picknik or gimp or other image processing software.Ever wondered, what is the actual thing going on there or how an image gets processed, how it is turned to blur or how it is filtered or what are the principles behind RGB, Grey Scale etc., If you are one among the few who likes to know and want to do it programmatically, it is just a applying a few functions with openCV and this is the most basic necessity for which openCV is created.For today let's discuss theory and tommorrow we will do programming.These are the standard def's of some of the main terms used in image processing
Pixel- Stands for "Picture Element".It is the basic unit of an image, just like seconds for time
Binary image - These are the oldest formats of images and most of these are oblivion, since it contains only two colors "Black" and "White" and each pixel is of just one bit, if it is 0 --> black and if it's 1-->White
Grey Scale Image - This is normally referred to as Black and white image and it's pixel consists of 8bits.If all those are zeros, then it is black and if all those are ones, then it is white and in the between values you will see the variations of colors obtained by the intermixing of black and white.
Note : And important point to note here is that although Binary images should be called Black and White, they are not called so. Hence in your Black and White TV, or any Black and White image you take, mostly you will see a variation of black and white colors, which are not exactly white nor exactly black.Remember, these are grey scale images actually.
RGB Image - This is normally referred to as color image and it's pixel consists of 24 bits, 8bits for each of Red, Blue and Green.You must have already known that the intermixing of these primary colors produces almost all the colors.If all the 24 bits are ones, you get a white image and if all are black, you get a black image
Note : Ever wondered, when people talk about 16 million colors, it's very simple, taking all the 24 bits as unit (although internally divided), we can change each bit as either 0 or 1, that gives us 2^24 or 16 million colors. Take a look at the below picture
The three pictures on the right side are black and white images, taken with red, green and blue filters, later on they are projected and combined to give a full color image.This was one of the earliest forms of taking color photographs
We normally when referring to the 8 bits, we don't use bit wise language which will be a bit confusing, and so we will be using 0 for all 0's and 256 for all 1's and between 0 and 256 for the remaining (Simply using the decimal format, instead of binary format)
Channel - Also called as component and this is the basic unit of pixel.The combination of 8bits is called a channel. So you can naturally say, that an RGB image is an 3 channelled image and Grey Scale image is an image with only one channel and generally we don't come across or discuss binary images at all, since bit wise representation is oblivion and it is generally ignored here and the rest of our journey with openCV.
Note : Although due to their bit representation, binary images are oblivion, they are not completely gone.Using heuristics you can easily note that for a grey scale image keeping a threshold (eg:127), you can convert all the pixels greater than threshold into 256 and all of them that are below to 0's, speaking in decimal language.But the actual binary representation is lost here.There is an openCV function CVthreshold(), to do this.See the documentation part you downloaded in the previous post.
This is it, take rest for today, but don't relax too much, because tommorrow it's going to be PROGRAMMING
Now you have crossed the most important barrier and came till here.Most people I know left the openCV during the installation itself feeling the complexity.Anyways, openCV is not for normal people :)
First of all, before getting started I want to introduce you to some links
The most important of all is the below link, which contains all the basics of getting started with openCV, try to implement and run the HelloWorld programme mentioned in the website Introduction to programming with OpenCV
Next, a common metting point for all openCV users in the world, just like a common meeting point for you with your friends is openCV users yahoo group.Join it
The above two links contain all the basic functionalities that you can use with standard openCV library and their corresponding meaning and uses. While doing the hello world programme, I mentioned above, these documents can be used for reference to know, what each open CV function does
The most important of all, compiling a C++ programme written in openCV, it's one of the lengthiest and you have no need at all to understand what it implies.Consider the name of your programme is "Hell.cpp" and you want a executable "Hell", below is the code for compiling it
If you have no Open Source OS installed still in your system, go to my previous post and there is a link to install openCV in windows. You can skip this post.
Also if you have openCV already in your system, skip this post.
OpenCV installing is very trivial and most of the sites tell you it's easy and give you four to five commands that get the things done quickly.But if you want to really harness the complete power of openCV, follow the steps below ( For Ubuntu, can be easily applied to other Linux based OS's )
1. Although OpenCV 2.2 is the latest version, 2.1 is more stable and has got enough libraries to keep you going.
2. Follow the below link to install openCV in a step by step manner (can be applied to all Ubuntu versions)
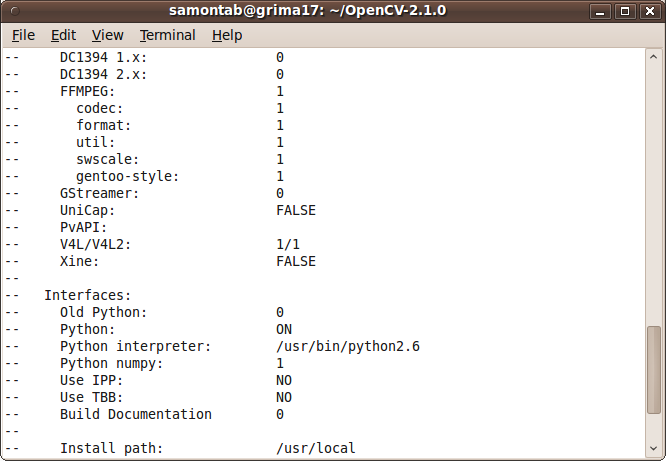
3. There is just one major step where you need to be carefull, the step where he tells you to check the below image
4. Don't proceed for the next step in that website, till all the parts in the above image, are exactly like the ones you see in your system
This is the way, I resolved the dependencies...
For example, beside FFMPEG in the image, I have a zero, where I need to have one, so I open the Synaptic Package Manager and search for that term and install it and rerun the "cmake ."
5. Try the examples to check your openCV installation and have some fun in the last remnants of that post
6. That's it, you have openCV now and we can keep going from the next post
And one more thing, if you are interested in doing cool things with images or photography, this is a link from the same website (Not at all related to openCV)
Update (20/06/11) : Forgot to tell you the one most important thing, before doing anything in the site I have given, you need to run the following command
This will automatically let you over come the ffmpeg error.Also, keep in mind, if anytime while fetching the packages through terminal, you can see, unable to fetch sometimes.Then immediately run the same command with --fix-missing as suffix and keep running it, until you never see the error.The advantage of running the command with this suffix is, it only tries to get the missing files.So for the above command, if you see unable to fetch archives, simply run
This post is just for the people, who don't have any open source OS or Mac in their computer.For those, who have, you can skip this post.
Hey, let's come back to the installing openCV part in the next post.But first of all, let me tell you one thing, if you are on windows and are planning to learn openCV with the help of Visual Studio or Visual C++ bla bla bla, you will find yourself eventually in a very dangerous position.
I don't say windows is bad.Windows is one of the awesome softwares made in the previous century, but if you are planning to become a serious DEV, in todays world, you have to shift in to one of the Open Source Operating Systems.One more thing people say and a common rumour is that these OS's are not user friendly and they are very unstable.Neverthless, no open source is as robust as windows and the things you hear are partially true.But most of the supporting libraries for openCV and the openCV user community is not inclined to this and you need to install a lot of libraries that may make your system unstable some times.But, if you still plan to go for it, here's the link and don't forget to skip the rest of this post.
If you dare to take a step forward in your learning, and why I supported Windows in the above paragraph.....
What's ringing in your head is true, I want you to keep windows in your machine, till you get acquainted with the new OS or you will get bored of it (Either ways, you can go back to your old OS or gain some knowledge).
Personally, I recommend Ubuntu, and more preferrably install any version between 9.10 and 10.10.If you want to get started with Ubuntu, you can search for a free E-book "Ubuntu Pocket Guide", a relatively small one, that seriously gives you the confidence of a dev.
Ok, we will come back to our point, straight forwardly, I want you to dual boot your machine with Ubuntu.But if you are just a normal guy, who had no knowledge of installing OS, I recommend going with "Wubi" installer.The best thing about Wubi is, it lets you install Ubuntu just like any other Program in the control panel, and you can uninstall it with just a single click.More help about using Wubi, downloading and installing at the below link
One more serious thing to consider, while installing is that, it asks for you to install in some drive, try to make a seperate drive for it.If you don't know this, no problem, here's your step by step guide about creating a drive or volume or partition (all are same, as per windows terminology)
I am stressing this because even though you can allocate a space of some 10GB, in your drive with some 70 GB space, when you switch to Ubuntu, none of this 70 GB you can see, but you can see the other drives.
If you don't like experimenting, install Ubuntu in the smallest drive in your system or the drive that contains no important information.
While installing with Wubi, it restarts itself and when restarting, there will be two options, either windows or Ubuntu, make it go into Ubuntu to complete the installation part.After that when ever you start your system, you will have both Windows and Ubuntu for dual boot and if you want to uninstall, just go to control panel in Windows and check for Ubuntu and press uninstall.And one more thing, 15 GB is good enough space for Ubuntu and if you plan to give more, 20 GB is more than enough.In the next post, let's see about installing openCV
If you already know a programming language, you are halfway through, since it's only a library and mostly it provides single line functions, that make the most complex tasks easier.
I personally don't recommend any book, since I have never read any book and have no patience to read except novels :)
All the examples I provide will be related to C-language and you can easily get it and understand correlating with other languages.
I will start with image processing and take you slowly to the part where open cv can be used to perform Face Recognition. One thing I want to mention here is that there is no robust face recognising software in the market.Yes, it's the truth.The one I demonstrate, also will not be, but you can use your creativity...
And one more thing, don't read all the posts at a time, each day follow a post and go into it thoroughly.Yeah, now coming to the titled topic, this is the starting step, which will be in my next post ..
Open CV stands Open Computer Vision Library, created by Intel to shower their Processor power, but eventually became the tool for machine learning.
So why you need to learn open CV and what it will hold up to in your future ?
Open CV has become the defacto library for image processing and face recognition methods and there is a large community based support for open CV. It provides all the simple tools in the form of functions that make the most complex tasks in image processing easier.One more important things is that every one knows the future is "Robotics", and open CV provides you with the most exciting features to pursue your career in Computer vision.
Although it primarily supports C++, it's libraries are found in other languages like Java, Matlab etc.,